Kafka Edition — Part 1 Introduction to data streams
- Rodrigo Ledesma
- Sep 11, 2022
- 6 min read
Welcome everybody, today we will be taking a detour from our normal Machine Learning activities because we will be creating the basis to understand Online Learning. I have been working for a couple of weeks with Kafka and I think it is an amazing tool for simulating real-life flows of information.
If you are new to my blog, normally I write about data science and machine learning techniques to analyze the waiting times in Disney and Universal parks, so that we can end up with a reliable prediction model to forecast how long it will take a normal visitor to wait in line for his or her favorite attraction and then be able to plan ahead your trip. But in these series of posts, I will be introducing and using Kafka and dockers to simulate the flow of information and have a dynamically updated model for our predictions.
Let’s begin our journey.
What is Kafka?
Glad you asked! Let me use first my words and then cite some professionals to let you know what it is, what’s it for, and why it is important to us.
Let’s imagine that we are shopping on Amazon. We see a nice collectible and we are about to buy it, we click on the item, then we click on add to the basket, and suddenly we realize the shipping is about the same price as the collectible and we cancel the operation. This was good for us, but sad for Amazon. Now imagine that you are working for Amazon and your Manager asks you to create a model that will predict how likely it is for a consumer to do what you did, abandon a purchase; so that before they leave, maybe they can give them a discount.
Given this information, we will be receiving a constant flow of data that comes from the millions and millions of interactions from the users with the interface. We need to process that information and also store it for a decent amount of time while we analyze it. Here is where Kafka comes in handy.
Kafka is a technological solution that is based on messages and queues. One part will act as the creator of the data, another as the consumer, and another will act as a storage room. They all have to be synchronized to allow one or multiple users to consume the data. This post is based on an excellent (a little hard to understand sometimes) tutorial that I will leave here, feel free to check it out if you want to dig deeper.
https://www.tutorialspoint.com/apache_kafka/apache_kafka_introduction.htm
Having a more serious definition Apache Kafka is a solution based on a reliable messaging system. The importance of a messaging system relies on the necessity of an application to use outsider data and process it. Kafka comes to save the day as it uses an architecture based on topics and partitions, which will ensure the safety of the data and also the channeling. As a result, the final application will not have to worry about communication, it will only worry about how to process it.
Kafka uses a type of messaging system called “Publisher-subscriber” in which the data is stored in batches called “Topics”. We can have as many topics as needed and in contrast with other solutions and architectures, different clients can subscribe to one or several topics to read the information. Going deeper into our terminology the information’s creators are called “producers” and the subscribers are called “consumers”
The magic within Kafka resides in its ability to store and replicate information. This solution is built on top of Zookeeper, whose purpose is to act as a coordinator for the Kafka brokers (servers). ZooKeeper service is mainly used to notify producers and consumers about the presence of any new broker in the Kafka system or the failure of the broker in the Kafka system. Based on these alerts, producers and consumers take action to ensure the continuity of the service.

The above image is very useful to understand how all parts coordinate and also the terminology.
Producer: is in charge of sending information to the brokers
Topics: Collection of similar data created by the producer
Partition: Replica of the data created to ensure the continuity of the service in case a server goes down.
Broker: A set of servers that store the topics and all information within
Server: A memory that stores information
Consumer: the client or subscriber that links to one or more Topics and queries the brokers to obtain information via messages
Now that we are confident and we know how Kafka operates inside, we can skip some technical information and go directly into using the service.
Using Dockers as a bridge
Kafka relies on zookeeper and on brokers, to store and control the information and its integrity. There are different ways to use this service, we can use an online service such as AWS, but in this case, we will be using something a little bit more local. We will be using a virtual machine running locally on our computers to store and manage the data. To create the virtual machines, we will be using Dockers, which already has some pre-configured images for Kafka and for zookeeper. So let’s take a look at how to download and configure the docker images on PC.
Installing Dockers Desktop: For this exercise, we will be needing Dockers and Docker Compose, fortunately, you can download everything in one single shot. Please visit the official docker web page using the following link.
Select your operative system and start the download of the file:

It will take a couple of minutes to download, but once it is done proceed with the default installation on your computer. And when the process is done, you should have something like this:

For the purpose of this activity, it is not necessary to create an account and log in, nor to use the upgrade services and pay for them. The application as-is is good enough for our purposes.
Now is when things spice up, we now need to create the images, fortunately, Dockers has some pre-built images for Kafka and for Zookeeper and we will be using them.
First lets create a .yml file with the instructions of the images:

As you can see the code is divided into two, the first image is called “wurstmeister/zookeeper” and it will be using port 2181. Our second image is called “wurstmeister/kafka” and we will have communication with it using the standard point 9092. Last we will define the hostname and the zookeeper connection.
Ok easy, save this file and store it in a save folder. Then use the following command to run the file and create and configure the images:
docker-compose -f docker-compose.yml up -dNow let’s use the images to create a topic and link the topic to our containers, it is actually pretty simple, we will be defining the name of our topic and our connections with the local host:
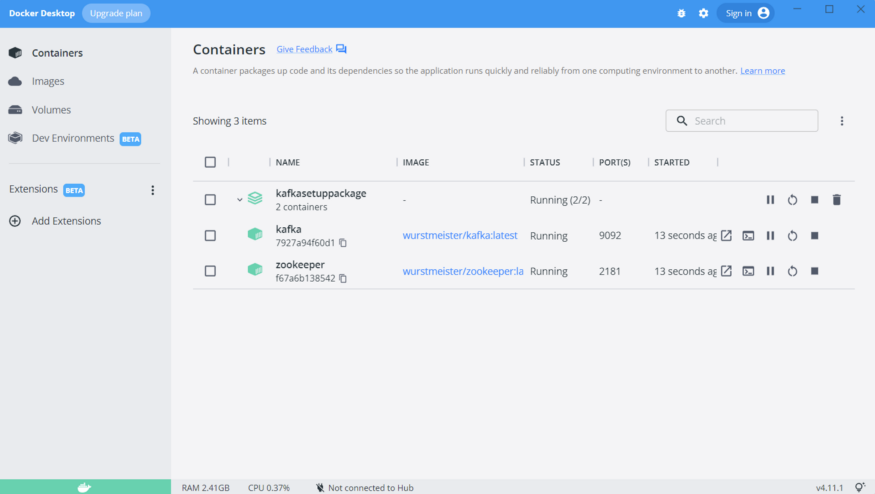
docker exec kafka /bin/bash -c "cd /opt/kafka/bin; kafka-topics.sh --create --topic exampleDisney1 --bootstrap-server localhost:9092"As I am using windows, I created a .bat file with these commands and the I simply run the .bat. After installing the images and creating the topic our docker desktop should look similar to this:

As you can see, our images are created and they are already running and ready to go! So let’s make use of them.
Creating Producer Consumer scripts with python
The first step will be to create a batch of information and then send it to the broker inside our docker images, for that I will be using a .ipynb.

The code is pretty self-explanatory, but let’s break it down. First, we create a producer object by calling the kafkaProducer API and setting our server’s configuration. Then to make sure we could connect we just validate it using the if and else statement. Then, we tell the API we will be writing to the topic we created on the last step when creating the images too.
Then we will be writing something extremely simple, we will create 1000 number in ascending order and concatenate the number with the word “number”. And as you can see in line 16 we use the .send() method to push the message into the server and the brokers.
Aaaand that’s it that was the hard part, easy such as winning a match against the Ottawa Senators isn’t it? Let’s then validate that our numbers were correctly stored by using the Consumer’s API.

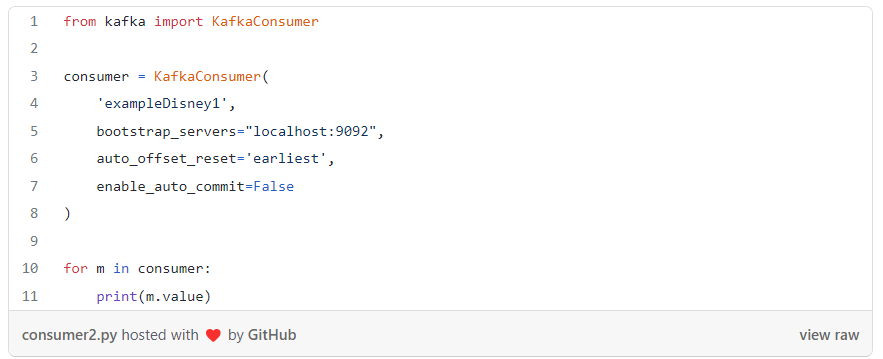
Here we will only be defining our topic’s name and the server. And of course, using the KafkaConsumer’s API. When the interface receives the message, then all we are doing with the values is to print them, and this is how they look like:

Super easy! Of course in this tutorial, we did not touch the partition configuration, but for our small example, it was good enough.
I really hope you enjoyed this post, and keep alert because we will then use this base to create adaptative models with Online Learning in the very near future. See you all next time!


Comments